Wireless Remote Control Switch Kit for LED Lights
Question from customer:
I want to put a 220V wireless switch to turn on / off the power of led lighting, this will make me a remote control switch. I want a basic on / off function product.
Answer:
I want to put a 220V wireless switch to turn on / off the power of led lighting, this will make me a remote control switch. I want a basic on / off function product.
Answer:
1 channel ac power input output remote control switch kit (S1X-AC220+C-2) is suitable for you. Its remarkable feature is ac power direct output, that is to say, you don’t have to supply additional power to being controlled device because it can get power from powered receiver.
It can long distance remote control AC 120V 220V electrical equipments, such as remote control lamps, strip lights, spotlights, outdoor lights, led lights, garden lights, motors, fans, pump, electric solenoid valves, and business signs.
You can turn on/off the receiver with transmitter (remote control) from any place within a reliable distance (about 100m); the wireless RF signal can pass through walls, floors and doors.
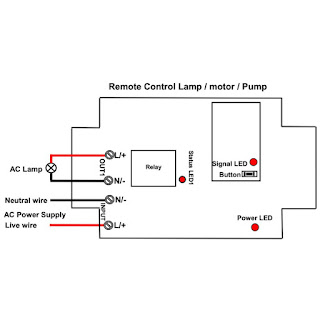
Connect AC power to the input terminals "L"&"N" of the wireless switch
Connect the input wires of the transformer for LED lighting to the terminal "OUT" of the wireless switch, and then connect the light to the output of the transformer.
To avoid transformer being always on, you can use transmitter to remote control it. There are 4 working modes in it. They are Self-locking, Momentary, Interlocking, Delay modes.
Setting different control modes:
1) Setting Self-locking mode: Press and hold the button of receiver until signal LED flashes 3 times, then release button.
Control mode Self-locking (working with transmitter C-1): Press -> On; Press again -> Off.
Press button of the transmitter: Terminals “OUT1” of receiver outputs AC power, the lamp is turned on.
Press button of the transmitter again: Terminals “OUT1” of receiver stops outputting, the lamp is turned off.
2) Setting Momentary mode: Press and hold the button of receiver until signal LED flashes 2 times, then release button.
Control mode Momentary (working with transmitter C-1): Press and hold -> On; Release -> Off.
Press and hold button of the transmitter: Terminals “OUT1” of receiver outputs AC power, the lamp is turned on.
Release button of the transmitter: Terminals “OUT1” of receiver stops outputting, the lamp is turned off.
3) Setting Interlocking mode: Press and hold the button of receiver until signal LED flashes 1 time, then release button.
Control mode Interlocking (working with transmitter C-2): Press -> On, Press another button -> Off.
Press button A of the transmitter: Terminals “OUT1” of receiver outputs AC power, the lamp is turned on.
Press button B of the transmitter: Terminals “OUT1” of receiver stops outputting, the lamp is turned off.
4) Setting Delay mode: Press and hold the button of receiver until signal LED flashes 4 times, then release button.
Control mode Delay (working with transmitter C-1): Press -> ON; Then OFF by itself after 5 seconds.
Press button of the transmitter: Terminals “OUT1” of receiver outputs AC power, the lamp is turned on.
After 5 seconds: Terminals “OUT1” of receiver stops outputting, the lamp is turned off.


Comments
Post a Comment